Print out a copy for future reference and revisit the instructions from time to time as you practice.
Instructions about how to make and use a wingbone yelper is covered in full detail in my book After the Hunt with Lovett Williams.
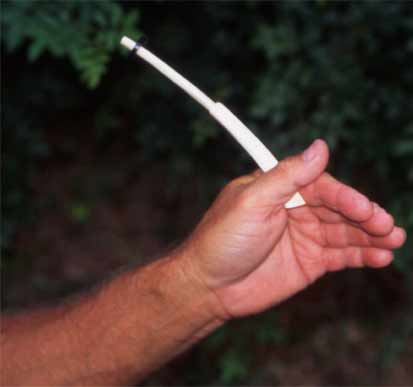
Step 1. Making the first sounds. Place the mouth piece of the yelper into the edge of your tightly closed lips. Some people insert the mouthpiece into the side of the lips but I hold mine in the middle. Suck in air abruptly, like making a mock kiss. It can be difficult to make any sound at all when you first try. When you can make a smacking sound, go to Step 2.
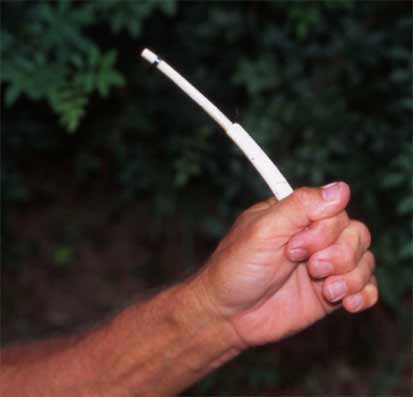
Step 3. Making turkey-like sounds. When you finally can make a sound, the notes will have a smacking quality. As soon as you can make smacking sounds, you are ready to begin to refine the tones. The first call to imitate is plain yelping, which you should begin to practice, but do not neglect the exercises in Step 4, next.
Step 4. Working on tonal quality. If you ever learned to play a musical instrument, you remember starting with simple exercises to make sounds and tonal sequences--you didn't start out playing "The Flight of the Bumblebee." Learning the wingbone yelper is the same way. Practice tone control by making notes of various pitch without always trying to sound like a turkey calling. Begin with a low note, then higher, and so on until you reach the high, screeching, kee-kee notes. Then start with high notes and come back down the scale. Try to hit various intermediate pitches as you practice. Practice making long notes. When you do, you will use your throat as well as your mouth and jaw, without thinking about it. Your lips will stay put and the partial vacuum in your mouth and throat will persist as you make a call. When you master long notes, you will find it easy to breathe through your nose as you yelp.
Practicing long notes is useful even for long-time wingbone users and especially for those who have given up the wingbone as a lost cause. You will stop smacking your lips after you master making long notes. Use this exercise in practice from time to time even after you begin to call turkeys with your yelper.
Step 5. Refining the sounds. Volume (loudness) is controlled by the amount of force used to draw in air. Pitch is controlled by the tightness of the lips. The depth of the mouth piece in the lips, the place the mouthpiece enters the lips, the angle the instrument is held, your hand position, and peculiarities of the instrument itself all affect pitch and tonal quality. Try small variations. You will learn only by trial and error.
In time, you will be able to soften the sounds and make notes of any length, pitch, and volume you wish including many of the sounds of the wild turkey.
Step 6. Practicing with your yelper. Practice often for short periods--five minutes at a time twice a week is better than trying to hold out for an hour or two a few days before the hunting season opens. Why brief sessions? Because the more practice you get in making the first note, the better you will get at starting out cold. You can only start out cold one time on each practice session. So do frequent brief sessions.
Your nervousness can make the first note especially difficult when you know there is a gobbler out there listening to you.
Step 7. Using the yelper in hunting. Go to the woods and use your yelper. Do not hesitate to call often and try to imitate every turkey call you hear. Turkeys are tolerant of calling by other turkeys and have no idea that a human predator has learned to imitate their voice.
If the first note of your imitated calling is not quite up to par, make the first sound at low volume and increase the volume with the next few notes. The turkey won't hear the first notes, but even if he does, he won't care. When you can pick up the yelper and make a good sound on the first try, you are getting there. That will happen eventually if you follow these instructions.
Turkey calling experience is best gained in fall when you can talk with the turkeys instead of only at them. On a good fall day, after you break up a flock, you may hear about 1/3 of the turkey's vocabulary. In spring, you hear only gobbling and a few other calls that have no relationship to calling in a gobbler. If there is no fall hunting season where you live, you can practice calling turkeys in the fall without hunting them. That can be very productive because you are more relaxed, you don't terminate the calling session by shooting, and you can observe calling behavior for longer periods. Fall calling technique is explained in my new book Wild Turkey Hunting & Management and recorded calls are in my audiocassette titled "Fall Calling."
Step 8. Aiming for mastery. If you need help in learning the turkey's calls to imitate, you will find my Real Turkeys™ recordings useful. The recordings have examples of the calls of hens and gobblers of all age classes as recorded in the wild. Ask for Real Turkeys™ recordings at your hunting supply dealer or order from this Web site, www.lovettwilliams.com.
After basic skill and initial confidence are developed, keep trying to improve on small flaws in technique and work on a wider variety of calls. Don't listen to other callers too long without checking back with the turkeys in the woods or listening to a good recording.
Keep yourself challenged as you learn but don't rush it. Developing skill requires the passage of time as well as practice. No matter how long or intensely you practice, you can't move forward faster than time will permit. Keep a yelper handy. When you see it, you will be reminded to practice for a few minutes.
The wingbone yelper is especially good for making the yelping calls (tree yelp, plain yelp, lost yelp), clucking, cutting, kee-kee, and kee-kee-run. These 7 calls are all you need for successful turkey hunting.
Step 9. Using the Lip Guide. The small disc (usually a faucet washer) on the mouth piece is useful in positioning the lips and creating airtight lip contact. I position the rubber disc about 3/8-inch down the mouthpiece and move it in or out on the mouth piece when it slips a little. Pushing the lips lightly against the washer flattens and tenses the lip muscles which favorably affects tonal quality.
Some trumpets and wingbone yelpers have lip guides fixed permanently in place. You may be able to remove the guide and substitute a flexible rubber washer. Or, if the fixed lip guide is too far from the end, add a washer or two to close the distance or cut off a small piece of the mouth piece tip to shorten it if necessary.
That should get you started on the right track to become a wingbone yelper user.
Welcome to the club and good luck!